Summary
READ ITWhat Is Instagram Product Tagging?
Firstly, in technical terms, product tagging is the process of attaching metadata to your products. This involves associating your products with digital content by defining, organizing, and categorizing them via tags. Labelling these items makes it easier for users to discover, learn more about the products, and purchase them if interested. All a user needs to do is tap on a post and then tap the products that pop up, to view their details.
Now that we have defined what product tagging is, let's better understand how it works on the popular social media app, Instagram. Instagram product tagging is the process of users buying products directly on the platform or receiving additional information on the item when clicking the tag. It is a highly effective feature that allows brands to tag their products on posts, stories, and now reels.
Product tagging is akin to a power potion for e-commerce brands on Instagram that are aiming to create a seamless shopping experience by turning their profiles into digital shopfronts. Consequently, the app’s product tagging feature streamlines the Instagram shopping experience for users and offers your business the benefit of not spending a large sum of money on advertising your products or services. In fact, Instagram marketers may like to know that this social media platform has the leading position for the highest return on investment (ROI), user engagement, and the biggest potential for growth in 2023. Due to this, it is a reliable and highly effective social commerce site where brands can sell their products with added features like product tagging.
Moreover, social commerce has become quite popular among Gen Z consumers. It is dated that in 2022 more than 25% of online consumers between the ages of 18 and 34 have shopped on Instagram and Facebook. Among other survey respondents, it was determined that 44% use Instagram for weekly shopping, hence using features like Product tags and the Shop tab.
Advantages of using the Product Tagging feature on Instagram
Why use the product tagging feature on Instagram? Let’s have a look at the benefits of applying this new tag feature.
Streamlined Shopping
This feature offers a seamless transition from product discovery to purchase, as it makes the customer buying journey a lot shorter and simpler. Consumers can now make a purchase with just a few clicks directly on Instagram. As a result, the swiftness of the entire process on Instagram encourages users to explore products further and helps them make purchase decisions.
Increased Conversion Rates
Instagram product tagging leads to higher conversion rates as a result of a simplified buying process and greater reach. Due to how direct it is to buy the product, it leaves little room for hesitation to occur. What's more is, obtaining the product information so easily with just a single tap, can make users confident in their purchase decision and hence drive more sales.
Enhanced Engagement
Having your products tagged on Instagram creates a captivating display for your users and entices them to engage with your tagged product. Offering an interactive approach such as this can drive repeat sales and foster viewers' trust in your brand. To take it a step further, if Instagram succeeds to expand the product tagging tool to all users, it will introduce a new way of making your product visible with non-sponsored content.
Who can apply the Product Tagging Feature on Instagram?
Having a shop is no longer the only way you can sell your products on Instagram. Instagram product tagging now offers an alternative way to sell your products and expand your reach. Due to the quick and easy access to product information and seamless purchasing through tagged products, user engagement, and conversion rates have drastically increased for businesses on Instagram. To begin using this highly effective feature, we first have to understand who can use it.
- Today on Instagram, products can be tagged by businesses, influencer profiles, and recently, regular users (so long as these users tag the correct brand when making their product-tagged posts).
a) Influencers receive a commission through tagged posts, which is also shown at the top of the post as a way of maintaining transparency with their followers and viewers.
b) Regular users that tag products in posts do not receive sales commission for the products purchased through their tags unless they make their own affiliate marketing agreement with a business.
- If you are a business on Instagram, you must have your brand approved and shop set up in order to tag products.
- If you are a business with an already set up Instagram shop, then you can allow other businesses, partners, or qualified public Instagram profiles to tag your products in their Instagram stories, posts, and reels.
- You can tag products if you're 13 years old or older with a public Instagram account. This can be achieved if your profile has been active in the last 30 days, has no more than 2 policy violations, or if you're a branded content manager to a business that permits product tagging.
Now that you know who can use Instagram product tagging, let's dive into the steps you need to take to set up your Instagram shop.
Set up your Instagram Shop
To set up your Instagram shop, you need to make sure you are eligible to do so. In order to be qualified for having an Instagram shop, you need to:
- Review Instagram's eCommerce Eligibility Requirements and make sure you comply with all of their policies.
- You sell a physical product, not a service.
- Check if you are in an eligible country for shopping on Instagram. If you are eligible but are temporarily relocated to a country that is not eligible, then you may lose the ability to apply certain features like tagging products.
- Ensure that your brand has its own website domain and had made your products available for direct purchase from the site. Your shop needs to represent the store/website associated with the website domain you will issue.
- If you want to tag on both Instagram and Facebook, you will need to connect it to a Facebook page.
- Most importantly, have a business profile or creator account set up. Should you not have one, you can set up a Business manager account in order to create your shop in commerce manager. This type of Instagram account allows you to manage the accounts of your ads, your pages, and those who may be working on them.
Now we can begin to list the steps to creating your shop on Instagram, so you can start to use the product tag feature.
- Go to your Instagram profile and tap Settings. Then you will tap on either 'business' or 'creator' depending on the type of profile you have.
- Here you will see the button “Set up Instagram Shopping”. Tap on it. Once you see the option “Get Started” button at the bottom, click on it.
- Then you will see that you need a Facebook Page to connect a product catalogue to Instagram. Click the button “Connect Facebook Account” below. This will connect your Facebook business page to your Instagram. If you don’t have one, select the option saying “Create a new Facebook Page”
- Once you have completed this step, you will be asked if you want to set up your account centre. Click on the button saying “Finish Setting up”. However, if you feel you are not ready, just select the “Not now” option.
- Now you should be able to see the page where you connect a catalogue. A catalogue is information on the products you will sell. You can connect your product catalogue using “Catalogue manager” on Facebook Business manager or through “Ecommerce platform partner”.
- Instagram will display a list of partners it works with in terms of ecommerce products. Click sync a partner platform if you're already selling your products on Shopify or BigCommerce.
- When selecting a catalogue, you need to make sure it meets the catalogue eligibility requirements for shops. However, if you do not have one, then just tap on “New catalogue”. Additionally, Instagram will then begin to review your profile and make sure it meets their Commerce Eligibility Requirements. The review process takes about a week, and you can check your status by going to “Settings” and clicking “Shopping”.
Allow Creators to tag your Products on Instagram
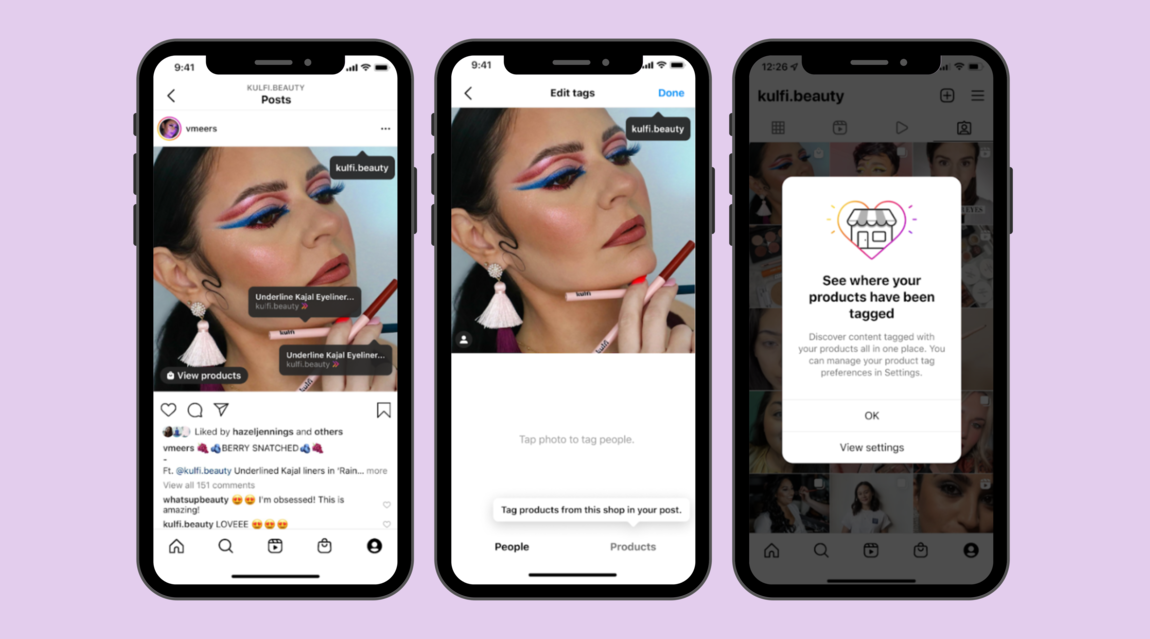
As a business on Instagram, you will most likely be collaborating with influencers for a campaign for your brand, or you may have an affiliate program. In this case, you can take advantage of the ability to allow content creators to add products tags to their posts. To have this feature, you will need to set it up on your profile.
- Open up your Instagram profile settings and click on the “Business” tab.
- Then you will click on the “Shopping” tab.
- After that, you will tap on “Product tags”.
- Here you can choose to give permission to have your products tagged by branded content partners only or by everyone. Tap on “allow product tags from only your branded content partners”
- Go back to the “Business” tab on Settings and select it.
- Click on “Branded content”.
- Here, you will select the influencers that you want to allow to tag your products. Find their handle and approve of them.
- Once the creator has been added to your approved creator accounts, they will be able to tag your products!
Now that you know who can tag products, what to do if you want your products to have tags, and how to allow others to tag your products, you can finally move on to the next phase. Below, we will find out how to tag your products in reels.
How to Get Started with Instagram Reels tagging
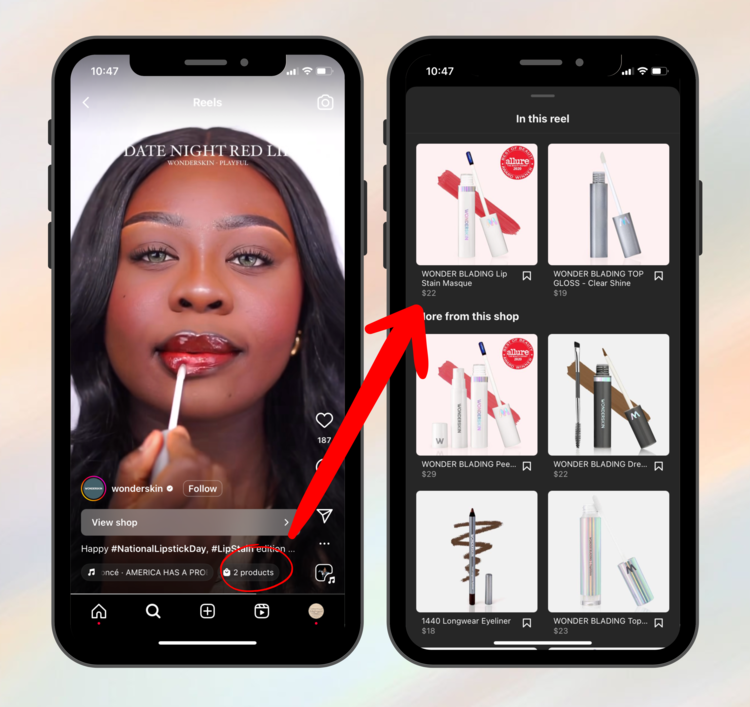
Around 1 in 2 people use Instagram to discover new brands. That is why it's important that you stay up to date with all of Instagram's new updates and create captivating shoppable content. People now use this social media platform to browse and shop products and services, or to seek inspiration from your own content.
In regard to other media types, Instagram Reels are well ahead by having an average engagement rate of 1.95%. Furthermore, they also have the highest average reach rate of 20.59% in comparison to images, videos, and carousels. Before we dive straight into how to tag products to your reel, let's explore how to create one first.
Record your Reel
If you're not familiar with creating a reel, do not worry, we will go over the steps to creating one, together! Reels can be recorded directly on Instagram, either one at a time or all in one duration, but they can also be created by uploading pre-recorded videos from your camera roll.
- Firstly, to create a reel you will need to go to your Instagram feed where you will select the “⊞” symbol at the bottom of the screen or just swipe right. Another way to begin making reels is by clicking on an existing reel, selecting the three dots, “…”, in the right corner and then either clicking “remix” (make your own version of their reel) or “sequence” (combining your videos with theirs). If you make a reel starting from an existing one, then skip to step 4.
- You will then be taken to where at the bottom of the screen you will see the different types of content you can choose to create: a post, a story, a reel, or go live. For this particular step, you will select “reels”.
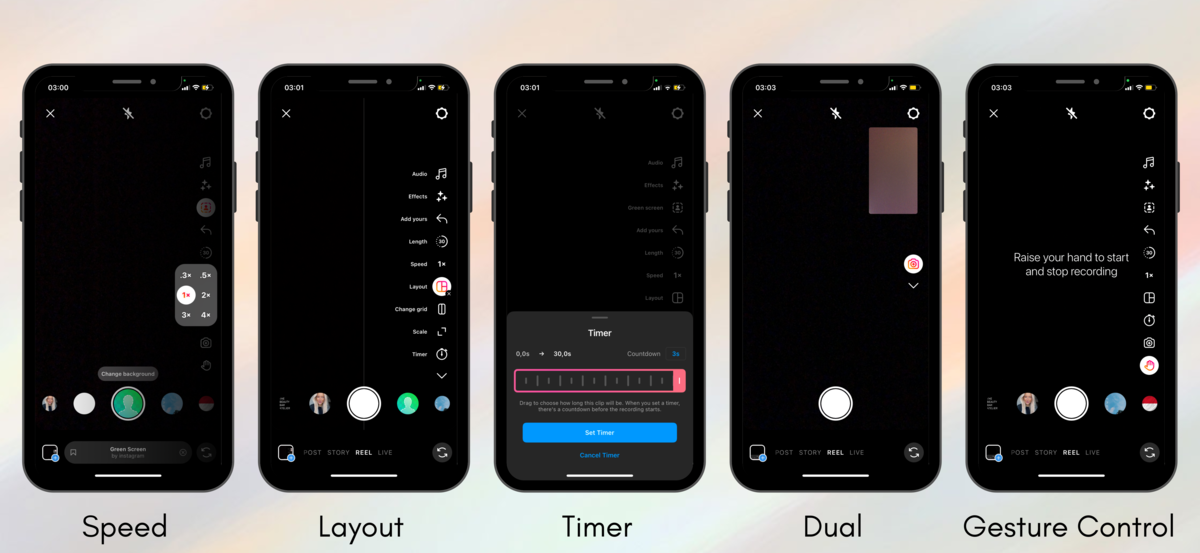
- Once you have done this, you will be able to see the reels tool menu on the left or right side of your screen. These tools help you customize your reel's content by making adjustments that will create a captivating, engaging, and personalized video experience for the viewers. These editing tools include:
- Audio: You can use your own audio when recording or uploading a reel. If you are a public account, your viewers ill be able to use your audio to make reels with it by selecting “Use Audio”. Another option is to search for a song in the Instagram music library, or you can use an audio you have saved already from other videos/reels on Instagram.
- AR Effects: When you select this tool, you will see a variety of effect options created by creator profiles or Instagram itself. It is important to note that you can apply different effect to different clips on your reel. Furthermore, in its own separate category amongst the reels tools you have a “Green Screen”, which is a highly interactive effects tool.
- Add Yours stickers: These stickers encourage your viewers to participate and interact with your reel, making the entire clip more engaging.

- Length & Speed: Adjusting the length may be crucial depending on the type of content you want to deliver. Perhaps you may desire a longer reel in order to deliver significant information, or you may need a shorter reel that's captivating. The length options for your reels are “15, 30, 60, and 90 seconds”. On the other hand, adjusting the playback speed allows you to create faster-paced content with quicker transitions or a slow motion video/audio for more emphasis.
- Layout: Once you have selected the layout tool, you will see different grid options for which you can record or upload videos. When you begin recording, you will notice that the rest of the layout you have chosen is black out. This is so that you record the different part of the layout one by one.
- Timer: Setting a timer will help you record the moment you have in mind without having to hold the record button with your hands. Set the timer to record any of your clips hands-free. The timer will give you a countdown, during which you will be able to adjust your position away from your phone.
- Dual: The dual tool enables you to record on both your front and back camera at the same time.
- Gesture Control: This tool is a new way of starting to record your video. All you need to do is make a hand gesture to your phone camera, and it will start recording without you need to press anything.
- Align: Line up objects from your previous clip before recording your next to help create seamless transitions for moments such as outfit changes or adding new friends into your reel.
- Now that you have recorded or uploaded videos, you can click “next” where you will be able to see further editing options. Here you can add other features to your reel such as stickers, GIFs, photos, and text. If you feel your reel is done, you can proceed to click “next” again. However, if you need to edit your reel and adjust the timeframe of certain clips and effects, or you need to reorder clips, then select “edit video”. After you are done editing, click on the blue arrow pointing to the right “→”.
After following these steps, you will officially be done editing a reel. To understand how to post an Instagram reel with product tags, keep reading!
Tag Products to your Instagram Reel
You have now completed the most complicated part of making a reel with product tags, which is designing it first. After you have complete step 4 from making a reel, you will be able to see the cover image of your reel.
- To adjust your cover image, select “edit cover” and slide left and right to choose which image you want as your cover, or “add” one from your camera roll. Once you have finished, select “done”.
- Add a caption toy our post if you'd like.
- Under the caption, you will see a list of options. Here you will spot “Tag Products” and select it. Then you will see a list of the products you want to tag, pick the product(s) or collection and click “add”.
- All that is left to do is post your real now! To do so, click “share”.
Tag Products to a post as a regular Instagram User (U.S. only)
Skip this paragraph if you are not from the United States. If you are a regular user without a shop or business account, and you want to tag a brand's product in your post as a way of supporting the brand, then the product tagging option appears differently to you. As of 2022, the ability to add product tags to feed posts without a business or creator profile, was made available to people located in the United States only. As you are creating a feed post, you will see the option “tag people”.
- Start by choosing a photo or video from your gallery to upload as a post. Once you have picked what you will post, click “next”.
- Add any effects or edits you want and tap “next” again.
- Now you will see the option to “Tag people”. Top it and search for the brand whose product you want to tag in your post. Once you have found the brand, click on it.
- Once you have tagged the brand to your image or video “which automatically turns into a reel now”, you will see two option appear below, “People” and “Products”. In this case, you will select “Products”.
- Tap on the photo to tag products where you want them to show up. Then find the product and select it in order to add it.
- Click “share” to publish your post.
How to Get Started with Instagram story tagging
Seeing as there is less editing that goes into making an Instagram story in comparison to a reel, we can dive straight into how to tag products on your stories.
Create a Post and Click the Tag Products
- Similarly to reels, to make an Instagram story, you will tap on the “⊞” symbol at the bottom of the screen of your home feed or just swipe right. If you tap the symbol, then you will need to select “story” where you can see media type options at the bottom of the screen like “post, story, reel, and live”
- You can now either record or take a picture for your story in real time. If you already have something recorded in your camera roll, upload the image or video by selecting the icon in the bottom left corner of your screen.
- After uploading or recording a photo or video, you will tap on the “sticker icon” which is like a squared smiley face.
- Select the “product” link sticker.
- Choose which product you want to tag on your story. You can only tag one product per image or video on your story.
- Once you are done, you can publish it.
.png)
5 things Marketers should know about Instagram Product Tags
As of 2019 and onwards, Instagram business profiles can allow creators to tag their products in their own content posts. Since 2022, the product tag feature has expanded to any Instagram users, however, this feature is yet to be made available across all regions. If you are a business looking to leverage your products tags, read on to find out different ways you can maximize the value of this feature.
How to Launch a Product
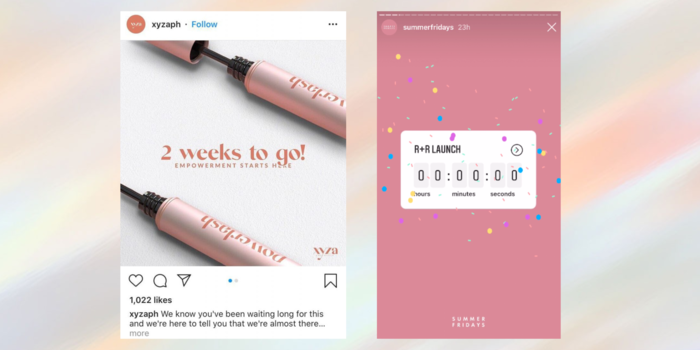
Firstly, let's analyse the steps you will take to launch your merchandise on the Instagram App:
- Go to your profile and select “View Shop”.
- Click on the menu and tap on “Manage Shop”.
- Tap on the tab saying “Product Launches”. However, if this is your first time doing this, select “Get Started”, to receive clearer instructions.
- Choose the product you want to launch and set in the launch date. Select a product to launch and the launch date.
- Now select “Schedule Launch” and finally share post. Keep in mind that if you decide to “share later” then you can tag products and apply the product launch sticker afterwards.
- It is important to note that only users in countries that have the checkout option on Instagram can purchase your new product launch.
If this does not work, read more about, how to create a product launch and the ways to promote it, on Instagram’s help centre.
These are only the technical steps to launching a product. However, a lot goes into this process. To have a successful launch, you need to be sure you have a clear understanding of your target audience. Furthermore, you want to make sure you have an effective content strategy, you take advantage of Instagram's editing features, make the right partnerships, and use ads.
An effective content strategy consists of producing high-quality content, choosing the right content format (story, post, reel, carousel, etc.), and partnering with influencers and/or expanding your reach by cross-promoting on other platforms. In a survey done by HubSpot on consumer trends, it was determined that 31% of social media users prefer to find out about new products via influencer profiles they follow. It is the perfect way for your brand to leverage an influencer's large following to increase your conversions and raise brand awareness. Finally, utilizing Instagram's features like product tagging, launch stickers, notifications, and detail pages on your products are all great ways of reaching your audience and hyping up your product. Last but not least, using paid Instagram ads is a less expensive and easy way of setting up an ad for your product launch. This will enhance your social media marketing by reaching a wider audience and increasing viewers' interest in your brand.
In creative terms, you want to make sure your product takes up most of the visual field in your post and is in a captivating light that will instantly grab a viewer's attention. If you want to further ensure you are piquing a user's interest, write a short caption! There are many ways to get creative on your launch post, don't be afraid to utilize all the features Instagram offers you to create highly engaging media.
Utilizing Checkout-Ready Products
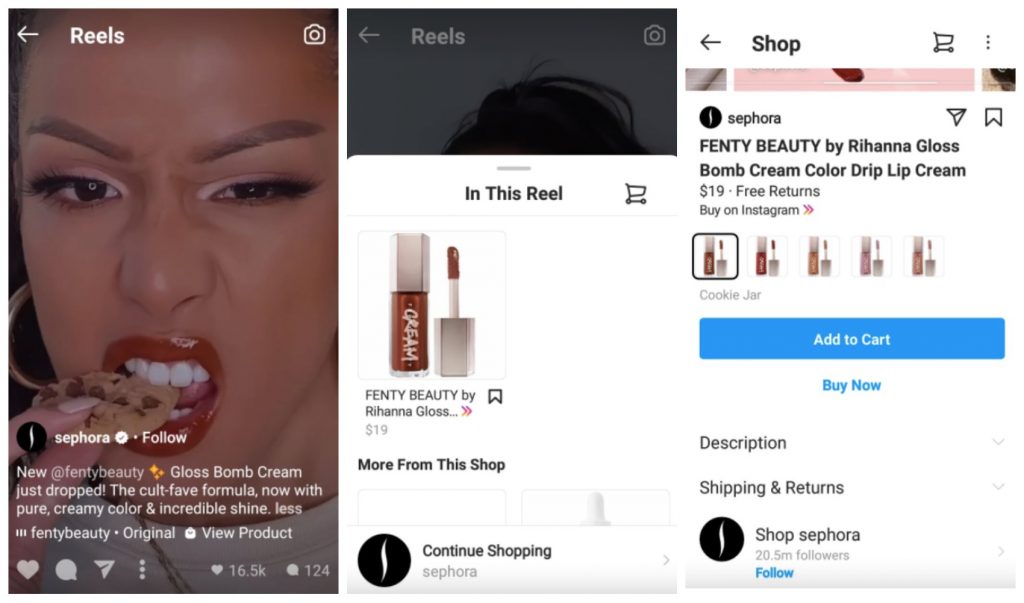
What are Instagram checkout ready products? On your Instagram shop, you have the option to enable customers to either be redirected to your website domain to make their purchase or to complete their purchase directly on the Instagram app. In this case, a checkout ready product is one that you are able to purchase without leaving the app. Promoting your products with Instagram checkout readiness, will drive your brand's growth by offering your consumers a seamless shopping experience. Having this feature not only creates quicker transactions and makes it easier to buy your merchandise, but it also positively influences conversion rates due to being mobile-friendly.
Display Products on sale on Instagram

When you have an Instagram shop set up, it may be even easier to promote your items when they are on sale. How so? A sales tag on Instagram can be a great incentive for your potential buyers to make their purchases. When you edit your products to be on sale, the product tags you have already set in place on existing posts or will set in place on future ones, will automatically state “on sale”. If other users or influencers want to tag your product, the product tag they make will have the same “on sale” feature.
Highlight a Brand Partner
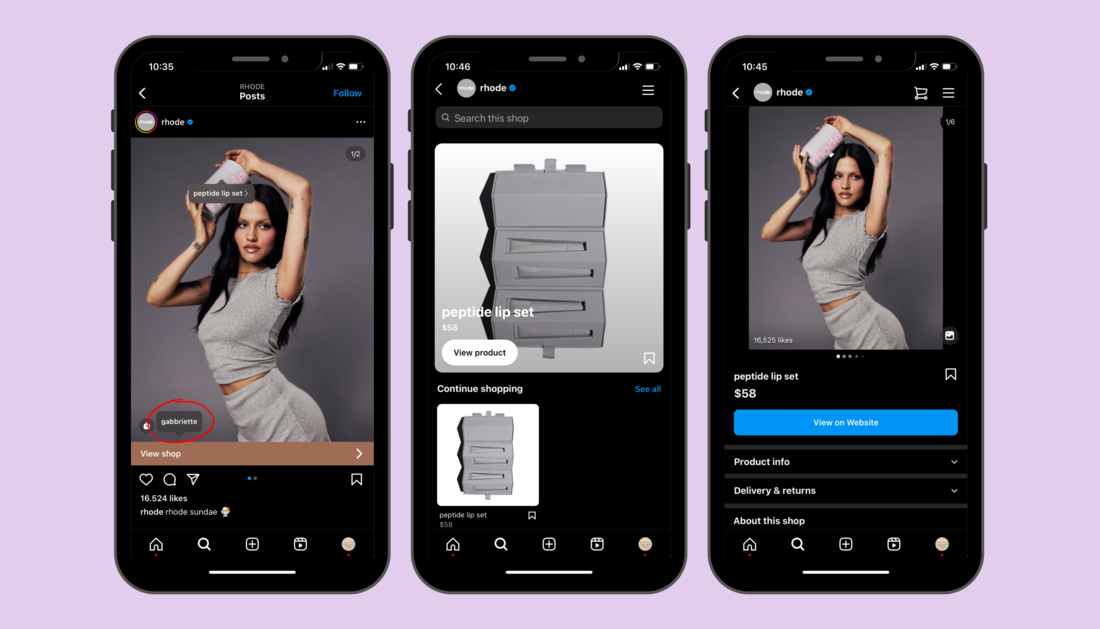
Not only can you tag products, but you can display account mentions on your posts. You may be wondering why you would do this. Well, some business partners may simply create high-value material that is greatly received by your audience, which essentially results in increased engagement. Adding both features is a powerful combination. Today, with the new product tagging expansion, you can also tag a product from the supplier or partner on the same image on which you have your own product tagged.
Produce an Instagram Carousel
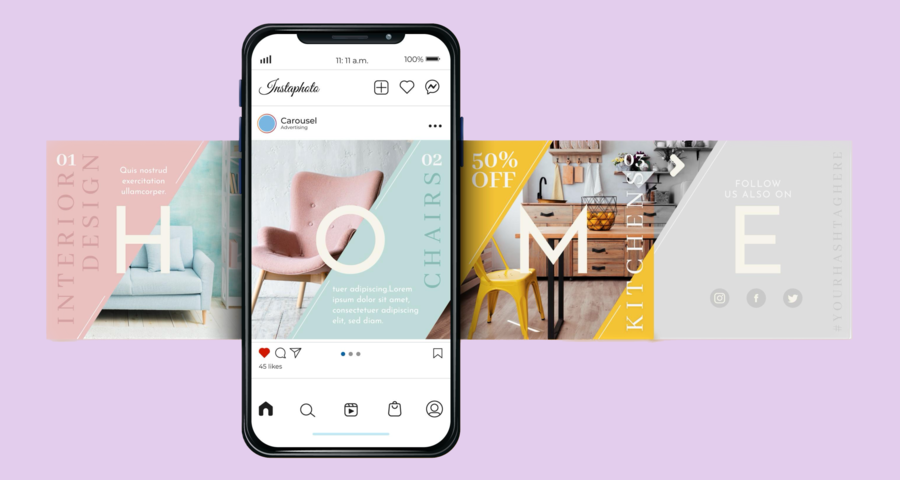
The 2nd most successful content type, after Instagram Reels, is an Instagram carousel. An Instagram carousel is a post with up to 10 photos or videos, which can be viewed by users when they swipe left on the post. On Desktop Instagram, you can view photos or videos by clicking the arrow on the side of the post. This slideshow view of media offers viewers a more immersive experience with your product. It encourages engagement as it offers valuable content variety within a single post and offers a diverse and compelling narrative of your products. Due to this, you increase user interaction by prompting users to pause, comment, like, share, and save your post. As a result, it is the perfect media type to drive more conversions
Most importantly, with Instagram carousels, you have a slideshow of multiple different shoppable products that contain separate product tags. To create a carousel post, you just need to tap on the select multiple symbol “❏” when creating your post and then choose the photos and videos you want to use. Make sure to select the photos or videos in the order you want to view them on your carousel post, because you cannot rearrange them once you click “next”. After you are done, tap “next” again and add details to your carousel post like product tags, captions, location, and hashtags, to improve visibility. Once you have finished, click “done” and your post will be published on your profile, while also appearing on your Instagram Feed.
Now Over to You
Product tagging on Instagram gives your business a powerful advantage when it comes to creating a seamless shopping journey, increasing conversions and enhancing your customers' loyalty. Combine this secret weapon with Instagram's most successful content type, reels, and you will see instant improvement in your user engagement. I hope that our article has helped clear up product tagging in reels and stories. I encourage you to follow our step-by-step guide and try it all out!

.png)
%20(1).png)

.png)
